AVI is really an old format that features large size and high compressed quality. Now there are devices support this format best, of course, there are programs as well, like the native player, movie maker, DVD maker of Windows PCs. But it’s another story for playing back AVI on Mac, definitely totally incompatibly, let alone burning AVI to DVD on Mac.
However, what if you want to burn AVI to DVD with iDVD? Apple products like iMovie, FCP, iDVD, etc seem to support MOV best, and so your AVI files can be unacceptable by iDVD. If you insist to burn videos with iDVD, it would be better for you to use a Video Converter Mac for you to convert AVI to iDVD, then import your converted files to iDVD for burning. Or else you can use a third-party DVD burner software for you to convert AVI to DVD for burning directly.
iOrgSoft DVD Creator for Mac can be the exact burner to burn AVI to DVD. And you can also burn all kinds of video files to DVD as well as create your own DVD menu with customized background image, music, words, button, and frame. You can just enjoy making your style DVD disc with it! It’s user-friendly for you and below I will show you how to burn AVI to DVD Mac in details:


Part One: How to create DVD with AVI files
Step 1. Import AVI videos to DVD Creator for Mac
First you should download and install the DVD Creator Mac, then add your AVI files to it by hitting the “+” icon on top left. You can import several videos only if they are in the limitation storage of your disc.

Step 2. Create DVD from AVI
If you want burning only, then you can strike “Burn” and there will be a “Setting” window pop up for you to set whether you want to save your videos into an ISO file or want to burn directly, whether you want the NTSC format or PAL one, etc. When setting is done, click “Apply” and the burning will begin automatically. To burn DVD, you should remember to insert a blank D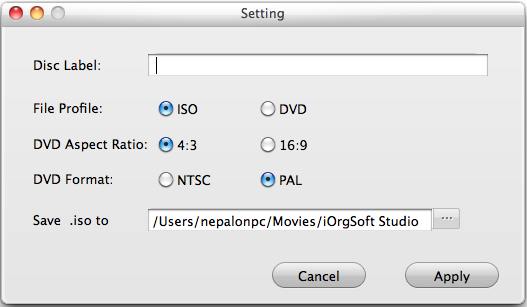 VD disc to the DVD-ROM.
Part Two: How to edit your videos and create a personalized DVD menu?
1. Trim (the only editing function of this DVD creator)
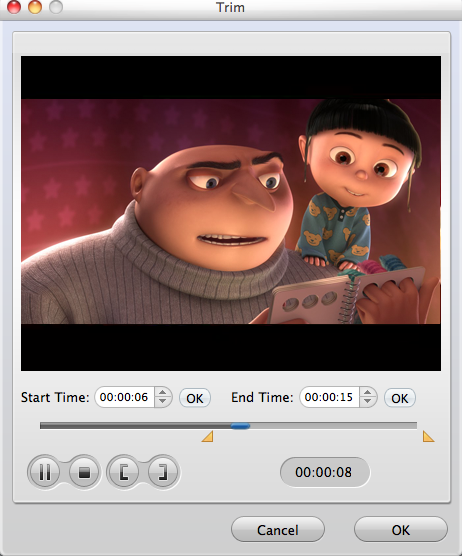
You are able to cut the unwanted period of your videos with the small icon in the right side of the adding files. Click it and you can see a “Trim” interface, you can drag the dog-ear icon in the timeline to set the period you want, or you can set the start and end time for the videos in the certain box.
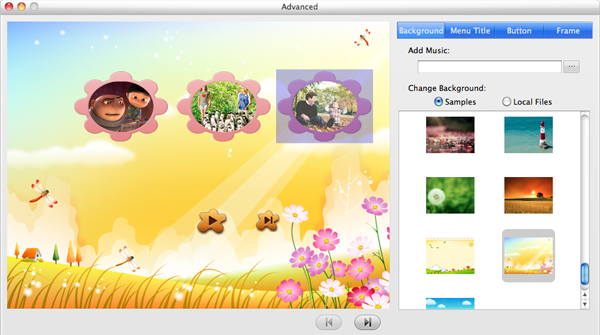
2. DIY your DVD menu
You may do all the customizing job with the “Customize DVD Menu” panel. First choose a template for your menu, then you can click the low-right tool icon to customize the background image, music, titles, button and frame as you like. The local image and music files are allowed to choose. When these are set ok, then you can click “Burn” and inset a blank disc for burning.